
|
TourMaker Reference Manual Intro | Getting
Started | Tutorial: Edit An Existing Tour The World Wide Web is immense and chaotic, and Tramline's TourMaker is a tool that provides control and focus for many applications.
Requirements
Installation
Getting
Started
First, a little terminology... We generally call our technology "virtual Web tours" or tours for short, with the exception of our "Virtual Field Trips" site, where we call them "field trips." Both mean the same thing. The tour window contains several components. Sites are viewed through the "site frame." The text for each stop (the "narration") appears in the "narration frame." Controls for navigating through the tour are in the "control panel." Note: The names for the control panel buttons and their functions are described in the Help page that is opened with the "?" button on the control panel. Opening TourMaker TourMaker is opened from the Start menu or from a shortcut like any Windows program. Registration Number Once you have installed and opened TourMaker, you are given a choice as to whether you will register your copy (and therefore unlock its full functionality) or just try the program in its trial mode. If you do not have one, a registration number can be purchased through our Web site http://www.tramline.com/store.htm. Once you enter your registration number in TourMaker, you will be able to save tours and the trial option will disappear. Note: Save the registration number in a safe
place because it will be needed if reinstalling the program ever
becomes necessary. The TourMaker Wizard Once you are beyond the initial registration/trial dialog box, you will see the TourMaker window that is very similar to the Tour Window. You will also see the TourMaker "Wizard," a dialogue box that allows you to choose whether to "Create a new tour" or "Edit an existing one." In this case, we'll try editing an existing one first and then discuss what you would do to create a new tour.
Tutorial:
Edit an Existing Tour
Note: You select the folder, not a file. If you look for a file to select, you'll never find one.
Enter whatever you wish here and click the Apply button--your entry should now appear in the narration window. OK, you've just added one stop with narration. Multiply that ten or so times and you have a tour. At this point, you now know the basics on creating a tour. We'd recommend you continue to play around with the sample tour for a while, though, and add, delete, or change it as you wish. When you're done, you can save your changes or just Quit the program to leave the Sample Tour as is. When done, you've experienced a good introduction to developing a tour. However, there are a few more things we'd like to point out.
Key
Features and Tips
Trial Use When you use TourMaker prior to registering, you can
test all its MyTours Folder TourMaker's recommended default location for tours
it creates: Tour Folder Tours are saved in folders containing all the associated files for the tour. When editing a tour in TourMaker, it is important to remember to select the tour folder, not a file, as TourMaker will only open a folder. HTML Editor You can select a program as your default HTML editor by selecting "Options" in the "View" menu. Note that Word and other word processors generally have HTML features and may be used. See also: "Custom Pages/Local Files." The Site Editor (Edit menu: Site Frame) The Site Editor allows you to search the Internet or your hard drive for the sites or local files you'll use as stops in your tour. In addition to basic browser features, it has some features designed specifically for tour creation. In particular, the bookmark feature allows you to annotate your bookmarks. You bookmark pages by clicking on the "Remember" button. When you do, the address will be stored in the Bookmarks window. You can write notes about these bookmarks and store them with the bookmark by selecting the Edit Notes button. In addition to searching the Web, the Site Editor allows you to select local files by clicking on the "Select Local File" button. If you haven't already created the local file, you can open your HTML editor by clicking on the Launch HTML Editor button. (Note: for this to function, you must first tell TourMaker what your HTML editor is by selecting Options in the View menu. Then browse until you find the program you want to use and select it.) Narration Editor (Edit menu: Narration Frame) The buttons allow you to format the text (bold, italic, etc.). You do so by highlighting the text and then clicking the button. If you want to add a link to the text, highlight the appropriate word, then click on the "Add Hyperlink" button. A dialogue box asking you to type a URL appears. Enter it and click OK. Your narration will now contain a link that when clicked will open another URL in the Site Window. Tour Properties There are many useful features to this dialogue box. The first
is that you name the tour in the "General" section as
it will appear on the automatic opening Help page. You can also
set the caching time for each stop (see below). Perhaps the most
important feature is that you will set the location of the web
page(s) from which your tour will be launched. Note: the
"Layout" and "Logo" options are not available
in the Educational Version. Caching Tours can be cached, i.e., automatically downloaded to a user's computer. Caching of stops occurs at predetermined intervals that the tour author can adjust in the Tour Properties dialogue box of TourMaker. The default setting is 30 seconds. In other words, each stop will be downloaded for 30 seconds before the next stop is downloaded. Since each stop has a different cache time, some stops will cache at one setting while others won't. Note that caching is turned off in TourMaker's authoring mode. It will only work in the actual tour.
Frames Every once in a while, we come across a site that is frame intolerant. That is, it will not allow itself to be viewed in a frame. If you put such a site in a tour, the narration and control panel windows would disappear the moment the site loaded. There are very few such sites on the Web, but they do exist. As a precaution, we’ve developed an automatic test that allows us to determine if a site is frame tolerant. When you click on the checkmark button (Use This Site) in the Site Editor, it automatically verifies that the site is frame tolerant. If it isn't, it will tell you so and you will have to find another site. Tour Structure Tours work best that are focused around a theme, topic, or story. There are no hard rules, but we try to keep ours to no more than 15 to 20 stops. The first stop is an orientation page with the title of the tour and some basic guidance for the user. It is automatically generated by TourMaker, but you can replace it with something else if you'd like. When possible, we also like to include an introductory page containing a brief overview on tour objectives and content, as well as any other relevant information (see Custom Pages, below). For example, if Shockwave is needed for some of the stops, here is a good place to mention it. Narration The narration frame is small, so the narration for any stop should be economical and efficient. Users will not want to do extensive scrolling to read it. That said, the narration should always identify the site being visited and the objectives of the visit (for legal reasons, Web etiquette, and just plain clarity), along with providing suggestions or instructions on what to do there. If a large amount of text is needed (such as background or reference information), you should consider making it into a custom page (see below). This allows you to integrate more content into the tour than the narration window can reasonably accommodate. Note: The narration frame automatically contains a hyperlink that will open the site being viewed in a third frameless window. This allows viewers to see the site without having it hemmed in by our frames. When a user moves forward or backward on the tour, this third window is automatically closed. Custom Pages/Local Files These are simple HTML documents stored on your server and downloaded to the user’s drive just like the web sites they'll visit. They are viewed through the Site Window on a tour. For example, TourMaker automatically generates a simple custom page for the first stop of each tour (mentioned above). Adding custom pages is an excellent way to provide context and content to a tour. Possible uses include providing background information on a subject, ancillary information to be printed and viewed while taking the tour, lists of additional links (see below), etc. Local files can be placed anywhere on the tour either as a stop or as a page brought into the site window by a narration link, and you can do anything on them that you see on any Web page. The only catch is that you'll have to create them yourself using an HTML editor and then save them as local files on your system. You can create a local file anywhere on your hard drive, but note that it probably shouldn't be in the actual tour folder you're working on, because TourMaker copies the file to that folder and will tell you it can't if the file is already there. Since Word and other word processors generally contain an HTML editor, you probably won't have a problem creating at least simple HTML pages, but you may need experience to achieve more ambitious results. That said, it is generally a good idea to keep both text and graphics simple for such pages. Lists of Links Since relatively brief tours are best, yet there are so many possible Web resources to see, it is often useful to develop a list of additional resources as a custom page and to include it as a stop (often the last) or stops in a tour. The tour format offers a significant benefit on such lists in that the user can explore them without getting lost: whenever they wish, they can return to the tour by clicking on the "Return To Tour" button on the control panel. Narration Links You can put a link into the narration that opens a second web page in the site window. This means, for example, you can take users to one URL at a stop and then instruct them to click on a link to see another URL or even a custom page. Technically, you can add as many links as you wish in the narration. However, because of the window's size and the fact that the narration at a stop cannot change even if the site does, you are pretty much limited to one or two additional links. In most cases, it is better to simply turn an additional link into another stop having its own narration.
To create a link in the narration editor, highlight the link and click on the "Add Hyperlink" button. A TourMaker Enter URL dialog box (below) appears in which you can enter your link. You then click on "OK" and a link appears in the narration frame that will open a new page in the site window.
Tutorial:
Creating A New Tour
And now it's time to create your own tours….
Posting
Your Tour to the Web
When you have completed and saved your tour, you will need to upload it to the Web in order for others to enjoy. But first you will have to:
Before we begin, let’s take a simple look at the tour process and then we’ll tell you how to do it. A user takes a tour by clicking a hyperlink on your web page. The tour launches (starts). When they are done with the tour, they click the Exit button on the tour control panel, the tour ends, and the user is returned to your web page.
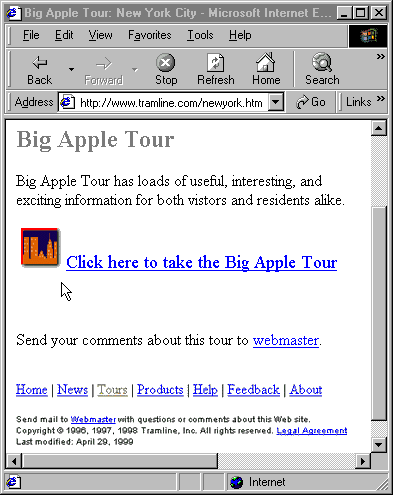
Creating a Launch PageUsing whatever tools you normally use to create web pages, create a web page (also referred to as a launch page because it is from this page that users will be able to launch your tour) that will have a link to your tour. You may want to have both a text link and an icon linking to your tour. Here's a sample page (below) that we created for our Big Apple Tour. We designed our page to include the tour name "Big Apple Tour", a descriptive sentence about the tour, and some other information relevant to our particular web site, however, the purpose of this page was to link to our tour, so there is both an icon link and a text link to the Big Apple Tour.
If you looked at the source code of the web page above, here is the HTML code you would see for the tour links. We'll go into more detail about this in the next sections but wanted to give you a sneak preview. Assuming that the tour folder is called "newyork", which
is stored inside the "webtours" folder at "www.tramline.com/tm/,
the html code for the Big Apple Tour icon link will be:
and here is the html code
for the text link which reads "Click here to take
the Big Apple Tour." Your code will be similar but you will instead be using the URL to YOUR tour on YOUR web site.
The Tourlaunch FileThe link to your tour on your launch page is a hyperlink to a specific file called _tourlaunch1.htm. (In the html code example provided above, you can see this filename in the last part of the URL.) The tourlaunch file serves two purposes:
This file is automatically generated (and placed in your tour folder)
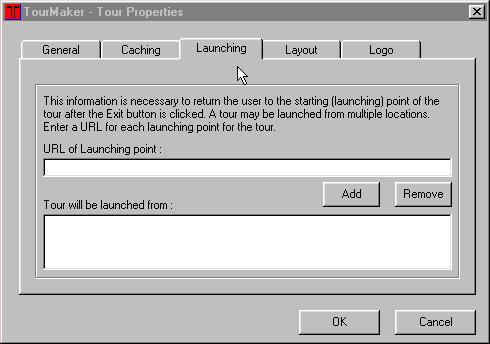
by TourMaker when you enter one or more URLs in the Launching tab
of TourMaker’s Tour Properties (If this isn’t clear, go
into TourMaker and click the Tour Properties button
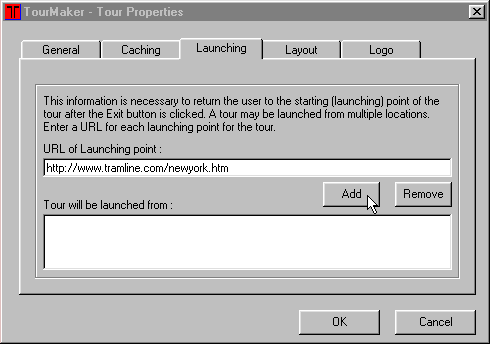
Enter the URL of the web page from where users will play your tour (this would be the URL of wherever you'll put the launch page you’ve created). Then click Add (see picture below). After you click Add, the URL will be visible in the Tour will be launched from: box on the right.
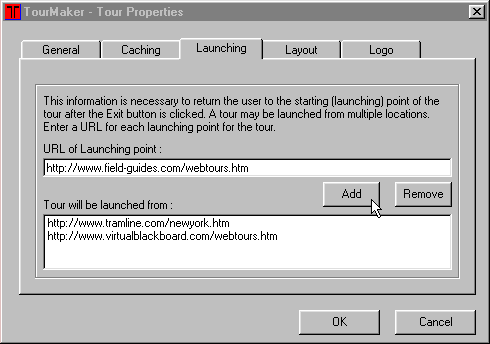
It’s possible to launch a tour from multiple locations but for each unique location you will need a slightly different version of the tourlaunch file. The first tourlaunch file is named '_tourlaunch1.htm', the second one '_tourlaunch2.htm' etc. Each successive tourlaunch file will be automatically created when you enter more than one URL in the Tour Properties Launch option in TourMaker (see picture below).
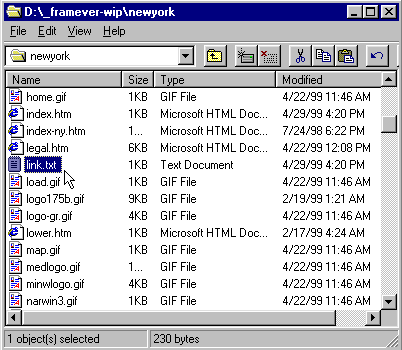
To launch the tour from the first URL, you need to create a hyperlink on your launch page to '_tourlaunch1.htm'. Similarly, to launch the same tour from a different web site or page (second URL), you will need to create a launch page at that location with a hyperlink to '_tourlaunch2.htm'. To see which tourlaunch file corresponds to which launching point, take a look at the file in your tour folder called link.txt.
This file is modified any time you change the URL list in the Tour Properties of TourMaker. In the example below, there are three different locations from which we want to launch our tour.
If I want users to access the Big Apple Tour (which is
stored at www.tramline.com/tm/webtours/newyork)
from www.tramline.com/newyork.htm (my
first launch page), then my link will look like this: Additionally, if I want users to access the Big Apple Tour
from www.virtualblackboard.com/webtours.htm
(my hypothetical second launch page), then my link could
look like this: Note that in both cases, the hyperlink points to the URL of the appropriate "_tourlaunch" file, where "_tourlaunch1.htm" will return the user to the first launch page which is located at the tramline.com site, while "_tourlaunch2.htm" will return the user to the second launch page which is located at the field-guides.com site.
The Link to your TourThe link to your tour is like any other link in that it consists of the URL to the appropriate tourlaunch file(see example below). Typical link: http://www.yourdomain.com/tourfolder/_tourlaunch1.htm yourdomain.com will be replaced with www.something.com or www.something.edu (whatever your domain name is) In our example above, the domain name is tramline.com tourfolder will be the name you gave your tour folder. You should use the same name on your web site that you used on your hard drive. In our example above, the tour folder is several levels deep. The tour folder called newyork is stored in a folder called webtours which is in a folder called tm. This is done for site organization purposes. tm/webtours/newyork/ _tourlaunch1.htm is the name of the file that actually launches your tour. In our example above, the tourlaunch is called _tourlaunch1.htm but if you play your tour from more than one location, you will have subsequent tourlaunch files such as _tourlaunch2.htm and _tourlaunch3.htm. So you can see that if you put it all together you have: http://www.tramline.com/tm/webtours/newyork/_tourlaunch1.htm Note: Most current word processors have the ability
to create HTML pages
Uploading Your Tour to the WebUploading your tour to a web site isn’t any different than uploading any other web page. You just need to make sure that all of the tour files in your tour folder on your hard drive are placed into a tour folder of the same name on your web site. If you have a tour folder on your hard drive called ‘tornado’ then you’ll want to create a tour folder on your web site called ‘tornado’. The ‘tornado’ folder on your hard drive has all of the tour files necessary for your tour to play so you have make sure to copy all of these files into the ‘tornado’ folder on your web site. Once you have your tour folder and files uploaded, you’ll want to upload your web launch page so people can take your tour.
Running
Tours from Your Hard Drive
Besides running your tours from a Web site, you can also run them off the hard drive on your computer. TourMaker saves all the tour files needed in the folder for each tour you create. You simply need to open the right one and the tour will run. There are various reasons this is useful, but in a classroom situation in particular, this means students can create tours and present them to class without having to post them to a central school web site. There's more than one way to run tours off a hard drive, but we recommend using your browser to open the right tour file. First you need to know where the tour was saved. TourMaker's default location for tours is the MyTours folder inside the TourMaker folder that is inside the Tramline folder. If you didn't change this and save the tour somewhere else, you should find it there. Once you know where the tour is, here's how you open it: In Explorer:
In Netscape:
If you need special assistance, contact us. |
TM Home | About TM | Benefits | Pricing | Clients | Download
the
software | the field trips | the
book | the training
Home | About Tramline
| Support | Store
| Contact
Send mail to ![]() with
questions or comments about this Web site.
with
questions or comments about this Web site.
Copyright © 1996-2007 Tramline. All rights reserved. Legal
Agreement.


